NBX100 Control4 driver setup:
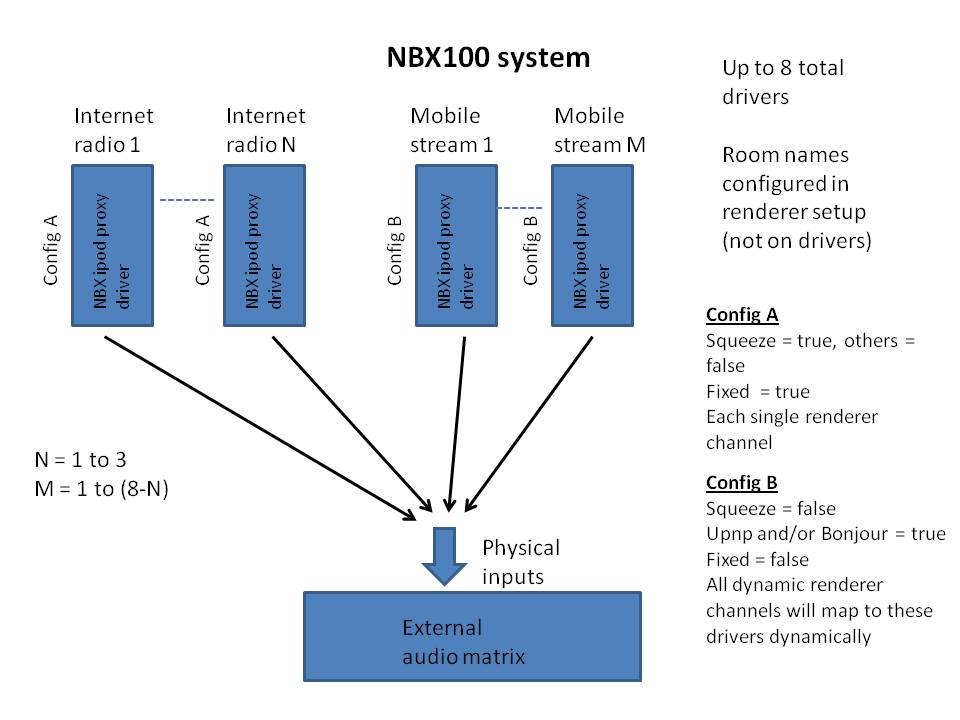
NBX100 is a multi channel streaming product, so you will use up to 8 instances of the NBX driver (1 per channel).
First, you need to decide how you will use the two enhanced user interface features of NetPlay audio.
Publishing mode:
Mobile streaming renderers normally publish themselves as a single device or virtual speaker. When you try to connect from your phone, you can select the device to play to. Then you switch to your Control4 remote to actually select that device as the source for your room and turn on the amps/etc. This is the default publishing mode known as "source mode".
NetPlay Audio offers a patent pending enhanced publishing mode known as "room mode". This mode allows you to publish channels for every zoned audio room and/or groups of rooms in the house. This allows the user to simply select the room to play to directly on the mobile device. The Control4 source selection and turn-on/off happens automatically. This mode provides a much better user experience and is the recommended mode for all NetPlay devices.
Note that with NBX100, the whole family can stream different audio to different rooms simultaneously.
Volume mode:
Most mobile apps allow volume control. However, integrating this "remote" volume with the Control4 room endpoint volume can be done different ways. NetPlay audio provides three different modes.
"Source volume" is the default mode and also how most mobile streaming renderers work. In this mode, the remote volume is applied to the signal before it is output from NBX, effectively making it a source volume control. The users C4 remotes and touch panels would then control the room endpoint volume, and the total effective volume is (remote_vol * room_vol). Even though this is how most devices work today, we think this is confusing and don't recommend using this mode in Control4.
"No volume" mode simply allows you to disable/ignore the remote volume control. This is easy to setup and easy for the customer to understand, but does mean they need to switch from the phone to the C4 remote to change the volume.
"Remote volume forwarding" is a Video Storm enchanced mode that applies the remote volume control directly to the Control4 room volume endpoint. This allows the customer to control volume directly using any device. This enhancement does require a device which supports discrete volume levels (vol up/down only devices cannot be controlled this way).
Driver architecture:
The recommended driver setup for NBX100 for Control 4 is:
Squeezebox will have 1-3 dedicated players, each with its own Squeezebox only driver. These will be fixed channels/outputs 1-3.
Bonjour / DLNA streaming uses "room mode" publishing and 3 to 5 simultaneous audio streams. 3-5 NBX drivers will be dedicated to mobile streaming (no squeezebox). These will be dynamic assignment (not fixed) to the next 3-5 audio outputs.
Device setup:
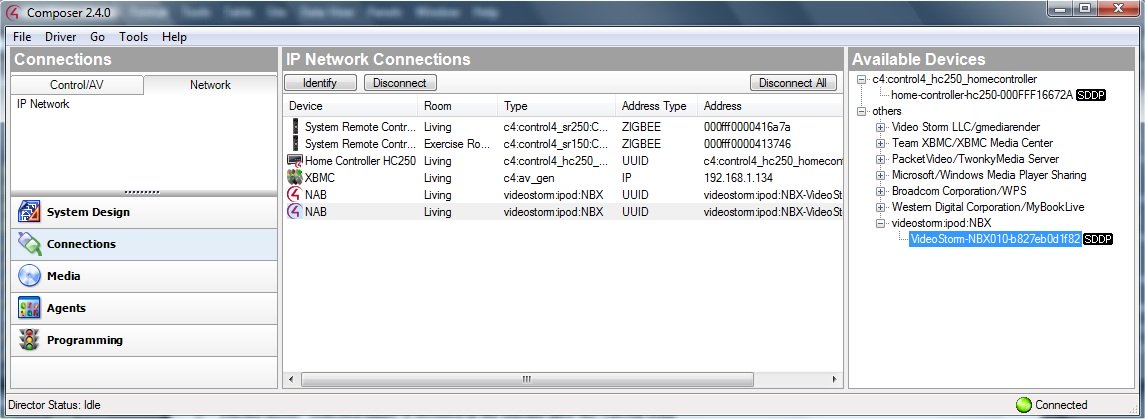
Now we need to configure the NBX using its own web interface. Connect to NBX by typing the IP address into any web browser. You can find the IP addresses of NBX using the MAC address in your routers DHCP table. Alternately, you can use a Upnp or Bonjour browser app on your smartphone to locate it. You can also use Composer, tools, network tools to find the IP address once you have bound the driver by UUID.
The next sections refer to the config pages located at the root index.php.
General config: No changes are typically needed here.
Renderer config: If you are using "Source mode", no changes are needed here. If using "Room mode", these instructions give complete details on renderer setup. For NBX100 specific to Control4, the recommended setup is as follows:

You will enable 1 to 3 channels for for "Squeeze" (LMS cloud and local music) sources. These channels will be set as "fixed" channels. Next you will enable all the "room" channels for mobile streaming. Enable one channel for each room that has speakers. These channels must be dynamic, ie "Fixed" is not checked.
Renderer volume config: The recommended mode is to use "Remote Volume Forwarding" or "No Volume" modes. For these modes, setup as follows:

If you are using "Source volume" mode, leave all these unchecked instead.
Renderer LMS config: If you have more than one enabled LMS server on the network, you will need to enter the IP address of the server to connect to here. However, this is very rare so most people don't need to change anything here.
Announcement service config: If you want to use the announcement engine on NBX, config it on this page. The NBX driver exposes the annoucement engine commands to director programming.
After making all these changes, we need to REBOOT NBX. This is NOT done by power cycling. Go to the "manual control" page and click on the REBOOT button there.
Driver setup:
The NBX driver will automatically be added to your project when you double click on the NBX from the available devices list. You can also add the driver manually if you prefer.
The NBX driver has 2 connections listed. The first connection is the control port and should always be tied to the UUID of the device. You can just drag/drop from the right panel onto this connection. The second connection is the LMS server port. If you are using the internal LMS (squeezebox) server on NBX simply connect this port to the SAME UUID. If you are using an external LMS server (PC/NAS/etc) you can enter its IP address here instead. If you are not using LMS (squeezebox), leave the second connection unconnected.
Additional driver instances will need to bind this connections by IP instead of UUID. This is a current limitation of C4 which only allows a single driver per UUID.
Next, go to system design and properties of the NBX driver.

If you are using Squeezeplayer, enter the MAC address of the NBX here. The MAC address will be the last part of the UUID, but be sure to enter the ":"s like above. The MAC address MUST be entered in lower case. The MAC address will increment by one for each squeeze player beyond the first (ie, virtual channel 2 is MAC+1, virtual channel 20 is MAC+19 in hexidecimal).
Squeezeplayer MACs only have to be entered for the drivers bound to the "squeeze" players (channels 1-3 in this example).
NOTE: If you start the player using the LMS server page (ip_addr:9000), you can read the MAC address from the "Current Player" field as shown above. This is a good way to double check you have the correct value.
Output channel should always be set to physical output number on NBX.
Virtual channel should always be set to false on NBX.
Show option properties: These set what options the user will see in the root menu.
Playlist/Shuffle/Repeat Mode property: (user editable) Sets user menu preferences.

Room Channel X Properties: These properties are used to "bind" the rooms published to Bonjour/DLNA to the rooms in your Control4 project. Simply enter the Control4 room name in each property in the same order as you did in the Renderer Channel config on the NBX (see pictures). You can bind multiple Control4 rooms to a single channel by entering room names seperated by colons (:). Note that the spelling and case MUST MATCH the room names in the Control4 project. These bindings will allow the driver to autostart and autostop this source in these rooms based on the mobile device selection.
Forward Volume Properties: If using "room mode" publishing and "Remote volume forwarding" modes, set this property to "On". This will forward the mobile device volume commands directly to the bound C4 volume endpoints in the selected rooms. These endpoints must be capable of handling discrete volume commands.
Actions & Commands: Many events and commands are available on this driver, but with the Media Service proxy the only ones you will commonly use are for "Direct Play" of audio stations. Direct Play setup is a two step process. First, start the station that you would like to have a Direct Play command for. Once it is playing, use the "Fetch_URL" action on the driver. This will capture the station URL to the Current URL property.


Next, create a custom button or other programming event and select your NetPlay driver on the right panel. Under custom commands, select "Play URL" and cut/paste the captured URL in the parameter field. Then drag/drop this command on your event.
